Navigation Links
Progressive Web Application Using React - Part Two
What will we be building?
Application Features:
Let's get started.
Step #1: Creating Repository and Installing our Packages
Create your GitHub reposotiry by going to https://github.com/new and after creating run the command git clone REPO_URL, In this case git clone https://github.com/dhruv-kumar-jha/reddit-pwa.git
First, Let's initialize our project by running the command yarn init -y, This will create package.json file with default data.
Now let's install all of our dependencies.., If we miss any dependency or require a new dependency we will just install it later on.
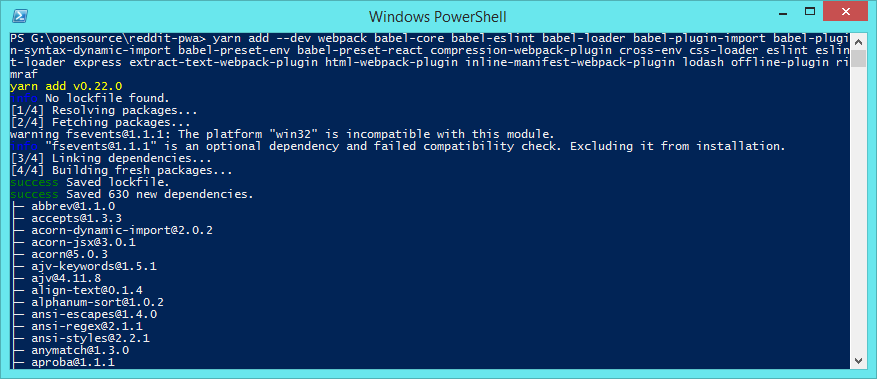
Run the command yarn add --dev webpack babel-core babel-eslint babel-loader babel-plugin-import babel-plugin-syntax-dynamic-import babel-preset-env babel-preset-react compression-webpack-plugin cross-env css-loader eslint eslint-loader express extract-text-webpack-plugin html-webpack-plugin inline-manifest-webpack-plugin lodash offline-plugin rimraf This will install all of our build dependencies.
Now let's install our actual project dependencies by running command yarn add --dev react react-dom react-router react-router-dom material-ui react-tap-event-plugin
Step #2: Setting Up Our Application Architecture and Webpack
In the root folder of our project, Let's create few directories named script, src and public
Create a new file named scripts/index.ejs and place this code inside it.
<!doctype html>
<html lang="en">
<head>
	<meta charset="utf-8" />
	<meta http-equiv="X-UA-Compatible" content="IE=edge">
	<title>Reddit PWA</title>
	<link rel="icon" href="/images/favicon.ico">
	<meta name="viewport" content="width=device-width, initial-scale=1, initial-scale=1, shrink-to-fit=no">
	<!-- place all the generated css files here -->
	<% for (var css in htmlWebpackPlugin.files.css) { %>
		<link href="<%= htmlWebpackPlugin.files.css[css] %>" rel="stylesheet">
	<% } %>
</head>
<body>

	<div id="root">
		<p>Loading...</p>
	</div>

	<!-- place the generated manifest file here, inline. -->
	<%= htmlWebpackPlugin.files.webpackManifest %>

	<!-- place all the generated js here -->
	<% for (var chunk in htmlWebpackPlugin.files.chunks) { %>
		<script defer src="<%= htmlWebpackPlugin.files.chunks[chunk].entry %>"></script>
	<% } %>

</body>
</html>
This file will be used to generate the HTML output for our index.html file.
Let's create a new file named scripts/webpack.config.dev.js and place this code inside it.
'use strict';

const webpack = require('webpack');
const path = require('path');

const BUILD_DIR = path.resolve(__dirname, '../', 'public/scripts');
const APP_DIR = path.resolve(__dirname, '../', 'src');
const PUBLIC_DIR = path.resolve(__dirname, '../', 'public');

const ExtractTextPlugin = require("extract-text-webpack-plugin");
const HTMLWebpackPlugin = require('html-webpack-plugin');


const VENDOR_LIBS = [
	'react',
	'react-dom',
];


const WebpackConfig = {

	entry: {
		bundle: APP_DIR + '/app.js',
		vendor: VENDOR_LIBS
	},
	output: {
		path: BUILD_DIR,
		filename: '[name].[chunkhash].js',
		chunkFilename: '[name].[chunkhash].chunk.js',
		publicPath: '/scripts/',
	},

	module: {
		rules: [
			{
				enforce: 'pre',
				test: /.js$/,
				exclude: /node_modules/,
				loader: 'eslint-loader',
				include : APP_DIR
			},
			{
				loader: 'babel-loader',
				test: /.js$/,
				exclude: /node_modules/,
				include : APP_DIR,
				options: {
					presets: [
						[
							'env',
							{ modules: false }
						],
						'react'
					],
					plugins: [ 'syntax-dynamic-import' ]
				}
			},
			{
				use: ExtractTextPlugin.extract({
					use: 'css-loader',
				}),
				test: /.css$/
			},
			{
				loader: 'json-loader',
				test: /.json$/
			}
		],
	},

	plugins: [
		new ExtractTextPlugin({
			filename: 'styles.css',
			allChunks: true
		}),
		new webpack.optimize.CommonsChunkPlugin({
			names: ['vendor', 'manifest'],
			minChunks: Infinity,
		}),
		new HTMLWebpackPlugin({
			inject: false,
			filename: '../index.html',
			template: 'scripts/index.ejs',
			minify: {
				collapseBooleanAttributes: true,
				removeComments: true,
				collapseWhitespace: true,
			}
		}),

	],

	resolve: {
		alias: {
			app: APP_DIR,
			public: PUBLIC_DIR
		},
	},


};

module.exports = WebpackConfig;
We will use this as our development configuration, For production we will use another config file, I will get to that in later part of this tutorial series.
Let's create a file named .babelrc and add this code in it
{
	"presets" : [["env",{ "modules": false }], "react" ],
	"plugins": [
		[ "syntax-dynamic-import" ],
	]
}
And create another file named .eslintrc and place this code inside it
{
  "env": {
    "browser": true,
    "node": true,
    "es6": true
  },
  "rules": {
    "quotes": 0,
    "no-trailing-spaces": 0,
    "eol-last": 0,
    "no-unused-vars": 0,
    "no-underscore-dangle": 0,
    "no-alert": 0,
    "no-lone-blocks": 0
  },
  "parser": "babel-eslint",
  "parserOptions": {
    "ecmaVersion": 6,
    "sourceType": "module",
    "allowImportExportEverywhere": true,
    "ecmaFeatures": {
      "modules": true,
      "jsx": true,
      "experimentalObjectRestSpread": true
    }
  },
  "globals": {
    "jQuery": false,
    "$": false
  }
}
I do recommend you dig little deeper into this and do your own research on .babelrc and .eslintrc
Now create a file named scripts/server.js and add this code in it, We will be using this file to run our local development server.
'use strict';

const express = require('express');
const app = express();
const path = require('path');

app.set( 'port', process.env.PORT || 1234 );

// make the entire contents of public directory accessible
app.use( express.static(
	path.join(__dirname, '../', 'public'),
	{
		// index: false, // don't look for index.html files in sub directories.
		extensions:['html']
	})
);


// for every request made, if the file doesn't exist, return index.html file.
app.get( '/*', (req, res) => {
	res.sendFile( path.join(__dirname, '../', 'public', 'index.html') );
});

app.listen( app.get('port'), function () {
	console.log('Server running at http://localhost:%s', app.get('port'));
});
As you can see this code will just run a simple static server and host the contents of our public directory.
Let's edit our package.json file and add these scripts, Making it easier for us to watch, build and serve our project.
  "scripts": {
    "start": "node scripts/server.js",
    "watch": "cross-env NODE_ENV=development webpack -w --config scripts/webpack.config.dev.js",
    "clean": "rimraf public/scripts",
    "build:dev": "npm run clean && cross-env NODE_ENV=development webpack -p --config scripts/webpack.config.dev.js",
    "build:pro": "npm run clean && cross-env NODE_ENV=production webpack -p --config scripts/webpack.config.pro.js"
  },
Do note webpack.config.pro.js file doesn't exist.. but that doesn't matter as we wont be using it now.
Finally, Let's create a new file named src/app.js and place this code inside it.
This is our main entry file, All of our application logic goes through this file.
'use strict';

import React from 'react';
import { render } from 'react-dom';

import { BrowserRouter as Router, Route, Switch } from 'react-router-dom'
import MuiThemeProvider from 'material-ui/styles/MuiThemeProvider';

// import all the custom styles
import 'app/css/style.css';


// Needed for onTouchTap
// It's a mobile-friendly onClick() alternative for components in Material-UI
import injectTapEventPlugin from 'react-tap-event-plugin';
injectTapEventPlugin();

import DefaultLayout from 'app/ui/layouts/Default';

import Dashboard from 'app/ui/pages/Dashboard';
import SubReddit from 'app/ui/pages/SubReddit';
import Settings from 'app/ui/pages/Settings';


// render the component
render(
	(
	<Router>
	<MuiThemeProvider>

		<DefaultLayout>
			<Route exact path="/" component={ Dashboard } />
			<Switch>
				<Route exact path="/dashboard" component={ Dashboard } />
				<Route exact path="/settings" component={ Settings } />
				<Route path="/:id" component={ SubReddit } />
			</Switch>
		</DefaultLayout>

	</MuiThemeProvider>
	</Router>
	),
	document.getElementById('root')
);
We're just importing the packages we installed earlier and adding all the routes, We're wrapping our Pages/Components inside MuiThemeProvider component provided by Materia UI and a DefaultLayout component., This sets up our application with our routes and basic styles.
Most of the pages/components we imported above doesn't exist, We will create them one by one.
Create a file named src/css/style.css and add this code inside it
/*
	Our Main Stylesheet.
 */

@import url("https://fonts.googleapis.com/css?family=Roboto:300,400,500");

body {
	font-family: "Roboto", sans-serif;
	background: #F7F8FA;
	margin: 0;
	padding: 0;
}

#root {
	min-height: 100vh;
}

.component--appbar {
	position: fixed;
	width: 100%;
	z-index: 10;
}

.component--content {
	padding-top: 64px;
}
Step #3: Creating Our AppBar, Drawer and Layout Components
Create a file named src/components/Header.js and add this code inside it.
'use strict';

import React from 'react';

import AppBar from 'material-ui/AppBar';
import Drawer from './Drawer';
import { withRouter } from 'react-router-dom';


class Header extends React.Component {

	constructor(props) {
		super(props);
		this.state = {
			drawer: false,
		};
		this.handleDrawerToggle = this.handleDrawerToggle.bind(this);
		this.handleDrawerChange = this.handleDrawerChange.bind(this);
		this.handleTitleTap = this.handleTitleTap.bind(this);
	}

	// when the drawer is toggled.
	handleDrawerToggle() {
		this.setState({ drawer: ! this.state.drawer });
	}

	// this will handle closing the drawer from the drawer component itself.
	handleDrawerChange( status ) {
		this.setState({ drawer: status });
	}

	handleTitleTap() {
		this.props.history.push('/');
	}

	// render the component
	render() {

		return (
			<div className="component--appbar">
				<AppBar
					title={ this.props.title || 'React PWA' }
					onLeftIconButtonTouchTap={ this.handleDrawerToggle }
					onTitleTouchTap={ this.handleTitleTap }
				/>
				<Drawer open={ this.state.drawer } change={ this.handleDrawerChange } />
			</div>
		)
	}

}

export default withRouter( Header );
This will display a nice AppBar and will also show a Drawer when clicked on the icon or when swiped from left to right.
Create another file named src/components/Drawer.js and place this code inside it.
'use strict';

import React from 'react';

import Drawer from 'material-ui/Drawer';
import MenuItem from 'material-ui/MenuItem';
import { Link } from 'react-router-dom';


const LeftDrawer = (props) => {

	const handleClose = () => {
		return props.change(false);
	}

	return (
		<Drawer
			docked={ false }
			width={ 200 }
			open={ props.open }
			onRequestChange={ (status) => props.change(status) }
		>
			<MenuItem onTouchTap={ handleClose } containerElement={<Link to="/dashboard" />} primaryText="Dashboard" />
			<MenuItem onTouchTap={ handleClose } containerElement={<Link to="/settings" />} primaryText="Settings" />
		</Drawer>
	)

}

export default LeftDrawer;
Create a file named src/ui/layouts/Default.js and place this code inside it.
'use strict';

import React from 'react';

import Header from 'app/components/Header';

const DefaultLayout = (props) => {


	return (
		<div>
			<Header title="Reddit PWA" />
			<div className="component--content">
				{ props.children }
			</div>
		</div>
	)

}

export default DefaultLayout;
Step #4: Creating all of our Pages
At very first let's create a file named src/components/Data.js, This will hold all of our static data.
'use strict';
const Data = [
{ id: '1', title: 'JavaScript', url: 'javascript', description: 'JavaScript' },
{ id: '2', title: 'React JS', url: 'reactjs', description: 'React JS' },
{ id: '3', title: 'SideProject', url: 'SideProject', description: 'A community for sharing side projects' },
{ id: '4', title: 'Frontend', url: 'Frontend', description: 'Bringing the web out of 2007 since 2013.' },
{ id: '5', title: 'Node', url: 'node', description: 'nodejs' },
{ id: '6', title: 'Entrepreneur', url: 'Entrepreneur', description: 'Entrepreneur' },
{ id: '7', title: 'Startups', url: 'startups', description: 'Startups' },
];
const Posts = [
{
"id": "6dzrv9",
"title": "Javascript Canvas help",
"author": "Guzzy711",
"content": "<!-- SC_OFF --><div class="md"><p>Hello, i want to display the two variable lines in at once, then wait some time, then display the next two lines etc.. I hope you guys can help me. :) <a href="https://codepen.io/anon/pen/NjVoPJ">https://codepen.io/anon/pen/NjVoPJ</a></p>
</div><!-- SC_ON -->",
"url": "https://www.reddit.com/r/javascript/comments/6dzrv9/javascript_canvas_help/"
},
{
"id": "6dzmys",
"title": "A list of resources that helped me learn the Fetch API for making server requests",
"author": "hopefulwarrior",
"content": null,
"url": "http://www.projectforrest.com/path/96"
},
{
"id": "6dzhye",
"title": "Ever wondered why node js maintainers want to keep the core small?",
"author": "fagnerbrack",
"content": null,
"url": "https://medium.com/the-node-js-collection/keeping-the-node-js-core-small-137f83d18152"
},
{
"id": "6dzd4u",
"title": "Build your own next generation view framework: <1kb Virtual DOM builder and patch algorithm.",
"author": "bucaran",
"content": null,
"url": "https://github.com/picodom/picodom"
},
{
"id": "6dz7tb",
"title": "Try to imagine how the best developer's documentation looks like. Is this close to it?",
"author": "st3dy",
"content": null,
"url": "https://www.froala.com/wysiwyg-editor/docs"
},
{
"id": "6dz3y5",
"title": "Did you know about the comma operator?",
"author": "xplozive",
"content": null,
"url": "https://medium.com/@xpl/javascript-did-you-know-about-the-comma-operator-ff9b511cc33"
},
{
"id": "6dz0kr",
"title": "React Native and the nine biggest pitfalls you'll face",
"author": "sindrehei",
"content": null,
"url": "https://youtu.be/9UahaciXAbU"
},
{
"id": "6dyxzi",
"title": "WordPress to Select New JavaScript Framework for Use in Core",
"author": "angelos_chalaris",
"content": null,
"url": "https://wptavern.com/wordpress-to-select-new-javascript-framework-for-use-in-core"
},
{
"id": "6dyx52",
"title": "Website vs Progressive web app",
"author": "LukeEllul",
"content": "<!-- SC_OFF --><div class="md"><p>Should I write a website the traditional way or write a Progressive web app with ionic and use it as a website?</p>
</div><!-- SC_ON -->",
"url": "https://www.reddit.com/r/javascript/comments/6dyx52/website_vs_progressive_web_app/"
},
{
"id": "6dyua2",
"title": "70% faster: rewriting the API that serves most of our traffic",
"author": "shidhincr",
"content": null,
"url": "http://tech.namshi.com/blog/2017/05/28/rewriting-the-catalog-api/"
},
{
"id": "6dyl9q",
"title": "Help finding LCM in javascript",
"author": "Flux-knot",
"content": null,
"url": "https://stackoverflow.com/questions/44235430/error-finding-lcm-in-javascript-with-larger-numbers"
},
{
"id": "6dyjyh",
"title": "How to randomly place non-overlapping sprites on a canvas?",
"author": "IamCarbonMan",
"content": "<!-- SC_OFF --><div class="md"><p>I have a canvas with dimensions 1920x1080, and about 500 png sprites in varying sizes. I have a script that uses node-canvas to randomly pick a sprite file and an xy coordinate and drawing the image there. How can I add the ability for the script to only pick xy coordinates which will not cause the image to overlap with a previously drawn image (if no place can be found to draw an image without overlapping one previously drawn, exit the script).</p>
</div><!-- SC_ON -->",
"url": "https://www.reddit.com/r/javascript/comments/6dyjyh/how_to_randomly_place_nonoverlapping_sprites_on_a/"
},
{
"id": "6dxm3a",
"title": "I'm using youtube to self teach myself javascript and Im having trouble making a function that blocks 2 items from touching.",
"author": "Tralion",
"content": "<!-- SC_OFF --><div class="md"><p>I&#39;m using p5.js to code a simple test game where you control a gray cube. I added an &quot;enemy&quot; cube to test out the collision system that i wrote (and it worked!) and now, i&#39;m trying to make a function that you can call taking 2 items you dont want to be able to collide with each other, and have it block each of those from going on top of each other. I&#39;m having trouble with that part, im not sure how exactly to start. I wrote a little bit of it (under the blockCollision() function in sketch.js) but im not sure where to start. I have the basic idea in my head but i cant translate it into code. </p>
<p><a href="https://drive.google.com/open?id=0B-F5CHOIQvvGaFRuU1JIZEtySTg">Here is my code</a>, sorry that it&#39;s in seperate files.
Go to \p5.zip\p5\Test Game and then you can see all of my code. </p>
</div><!-- SC_ON -->",
"url": "https://www.reddit.com/r/javascript/comments/6dxm3a/im_using_youtube_to_self_teach_myself_javascript/"
},
{
"id": "6dxltf",
"title": "CampJS VIII - Early bird tickets now available",
"author": "fpvsoldermeup",
"content": null,
"url": "http://viii.campjs.com/"
},
{
"id": "6dx55s",
"title": "[Codepen] D3.nest + Higher Order Components",
"author": "mtmoonzubat",
"content": "<!-- SC_OFF --><div class="md"><p>Here&#39;s a showcase of two really powerful concepts from d3 and React, respectively: grouping data with d3.nest(), and using Higher Order Components (HOCs) to render that data. </p>
<p><a href="https://codepen.io/pj_/pen/GmLyjy">Check out the pen here</a></p>
<p>I&#39;ve also written <a href="https://codepen.io/pj_/post/tiddly-bits-nested-data-and-higher-order-components">a companion post</a>, which goes over how to use d3.nest and HOCs. I&#39;m calling these post &quot;Tiddly Bits,&quot; and I got a lot of good feedback on my last one. Comments and criticism alike are more than welcome.</p>
<p>Thanks for reading!</p>
</div><!-- SC_ON -->",
"url": "https://www.reddit.com/r/javascript/comments/6dx55s/codepen_d3nest_higher_order_components/"
},
{
"id": "6dwwcj",
"title": "Making AI with native js",
"author": "PFdip",
"content": "<!-- SC_OFF --><div class="md"><p>I made an AI chatbot with native JS, no libraries or anything, and it uses lots and lots of &quot;if&quot; statements to function. Is there a more efficient way to do it? I&#39;m not the most advanced programmer. </p>
</div><!-- SC_ON -->",
"url": "https://www.reddit.com/r/javascript/comments/6dwwcj/making_ai_with_native_js/"
},
];
export default Data;
export {
Posts
}
Now create a file named src/components/SubRedditItem.js. This will be used to display all of our Subreddits.
'use strict';

import React from 'react';

import { List, ListItem } from 'material-ui/List';
import { withRouter } from 'react-router-dom';


const SubRedditItem = (props) => {

	const { data, history } = props;

	// when clicked run this function
	const handleTap = () => {
		return history.push(data.url);
	}

	return (
		<ListItem
			primaryText={ data.title }
			secondaryText={ data.description }
			onTouchTap={ handleTap }
		/>
	)
}

export default withRouter( SubRedditItem );
For displaying posts, Create a file named src/components/SubRedditPost.js.
'use strict';

import React from 'react';

import { List, ListItem } from 'material-ui/List';
import { withRouter } from 'react-router-dom';
import Divider from 'material-ui/Divider';


const SubRedditPost = (props) => {

	const { data, history } = props;

	// when clicked run this function
	const handleTap = () => {
		return history.push(data.url);
	}

	return (
		<div>
		<ListItem
			primaryText={ data.title }
			secondaryText={ data.description }
			// onTouchTap={ handleTap }
		/>
		<Divider />
		</div>
	)
}

export default withRouter( SubRedditPost );
Create a file named src/ui/pages/Dashboard.js and place this code inside it
'use strict';

import React from 'react';
import Paper from 'material-ui/Paper';

import { List } from 'material-ui/List';
import Subheader from 'material-ui/Subheader';
import SubRedditItem from 'app/components/SubRedditItem';

import Data from 'app/components/Data';


const Dashboard = (props) => {


	return (
		<Paper style={{ padding: 20, }} zDepth={1} rounded={false}>

			<List>
				<Subheader style={{ textTransform: 'uppercase' }}>Sub Reddits</Subheader>
				{ Data.map( item => <SubRedditItem key={ item.id } data={ item } /> ) }
			</List>

		</Paper>
	)

}

export default Dashboard;
For our settings page, Create a file named src/ui/pages/Settings.js and add this code
'use strict';

import React from 'react';

import Paper from 'material-ui/Paper';


const Settings = (props) => {

	return (
		<Paper style={{ padding: 20, }} zDepth={1} rounded={false}>
			<h2>Settings Page</h2>
			<p>All the settings for our application will go here.</p>
		</Paper>
	)

}

export default Settings;
Now create a file named src/ui/pages/SubReddit.js and add this code
'use strict';

import React from 'react';
import Paper from 'material-ui/Paper';
import Data from 'app/components/Data';
import _ from 'lodash';

import { List } from 'material-ui/List';
import Subheader from 'material-ui/Subheader';
import SubRedditPost from 'app/components/SubRedditPost';

import { Posts } from 'app/components/Data';


const SubReddit = (props) => {

	// lets replace / from the url
	const current_subreddit = _.replace( props.location.pathname, '/', '' );
	const data = _.find( Data, { url: current_subreddit } );

	return (
		<Paper style={{ padding: 20 }} zDepth={1} rounded={false}>
			<h2 style={{ margin: 0, paddingLeft: 16 }}>{ data.title }</h2>

			<List>
				<Subheader style={{ textTransform: 'uppercase' }}>All Posts</Subheader>
				{ Posts.map( item => <SubRedditPost key={ item.id } data={ item } /> ) }
			</List>


		</Paper>
	)

}

export default SubReddit;
And for our last page, Create a file named src/ui/pages/NotFound.js and add this code
'use strict';

import React from 'react';

import Paper from 'material-ui/Paper';


const Settings = (props) => {

	return (
		<Paper style={{ padding: 20, }} zDepth={1} rounded={false}>
			<h1>Page Not Found.</h1>
			<p>You can try going back.</p>
		</Paper>
	)

}

export default Settings;
That's it. We're done.
Step #5: Testing our Application
Run the command yarn build:dev once the build is complete, run the command yarn start
You can now see the URL and port where the server is running, In this case it's http://localhost:1234, Open the URL and you will see something that looks like this.
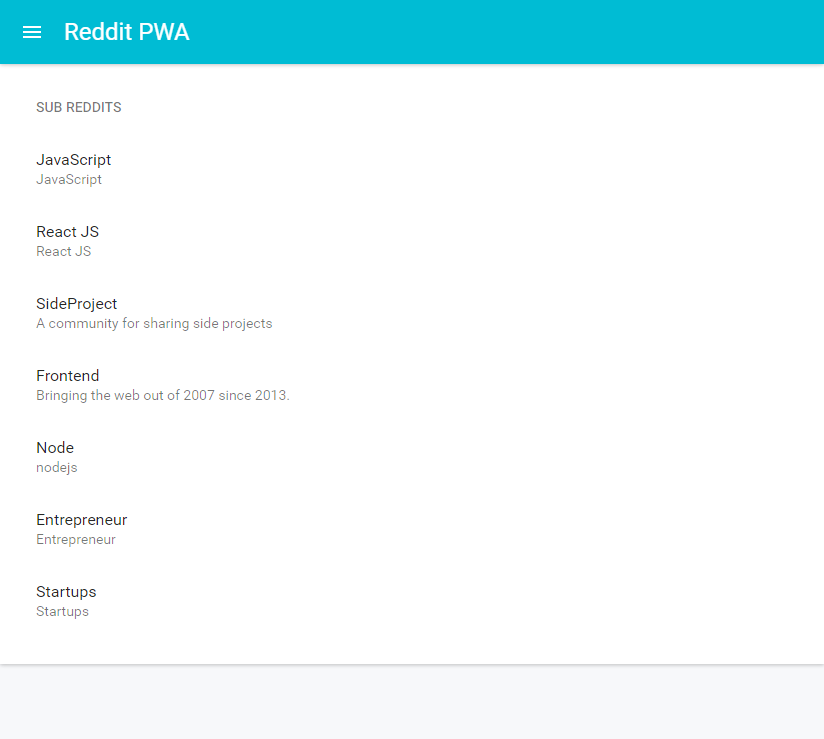
Open Developer Tools (keyboard shortcut ctrl + shift + i), Click on Toggle device toolbar (keyboard shortcut ctrl + shift + m) and you will see something like this.
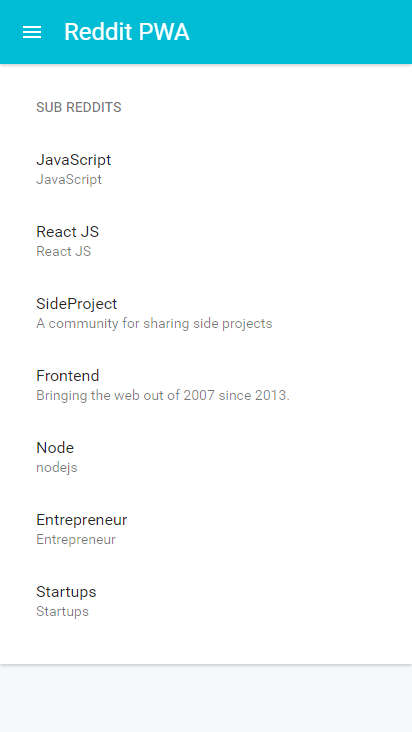
And that's our User Interface., We will customize it later on., But this is the layout we're going forward with. Play around with it and let me know if you encounter any errors/issues.
Step #6: Hosting Our Application
If you need an in-depth tutorial on how to use Firebase, Checkout Step#5: Publishing Our Website of https://www.dhruvkumarjha.com/articles/building-a-static-website-using-react-js-part-2-creating-and-hosting-the-website
Just create a new Firebase Project and then in project root directory open terminal and run the command firebase init and follow the instructions accordingly., Once done run the command firebase deploy and you can see the URL of live application.
Let's commit our code to GitHub as well. (run the command git add -A, git commit -m "Version One" and git push)
In this case, The links are as follows
Conclusion
I didn't go in detail over the code I have used as they are pretty much self explanatory, However if you want me to go indepth let me know.
Hope this was a good read, Let's continue in next Tutorial.