Navigation Links
Build a Notification Service Using AWS CodeStar, Node and Lambda
Step#1: Prerequisites
After creating AWS account, Please add a new user, Using that users account we will be cloning the repository created by AWS CodeStar and pusing our code to it.
Open https://console.aws.amazon.com/iam to create a new user, Enter the User Name, click on Next: Permissions and there please add these permissions AWSCodeCommitFullAccess, AWSLambdaFullAccess, AWSCodeStarFullAccess, AmazonSESFullAccess and AmazonSNSFullAccess
Once the user is created, Click on User name to open the users profile, Click on Security Credentials tab, There find HTTPS Git credentials for AWS CodeCommit and click on Generate button this will generate new security credentials which we can use to clone repository and commit changes to it.
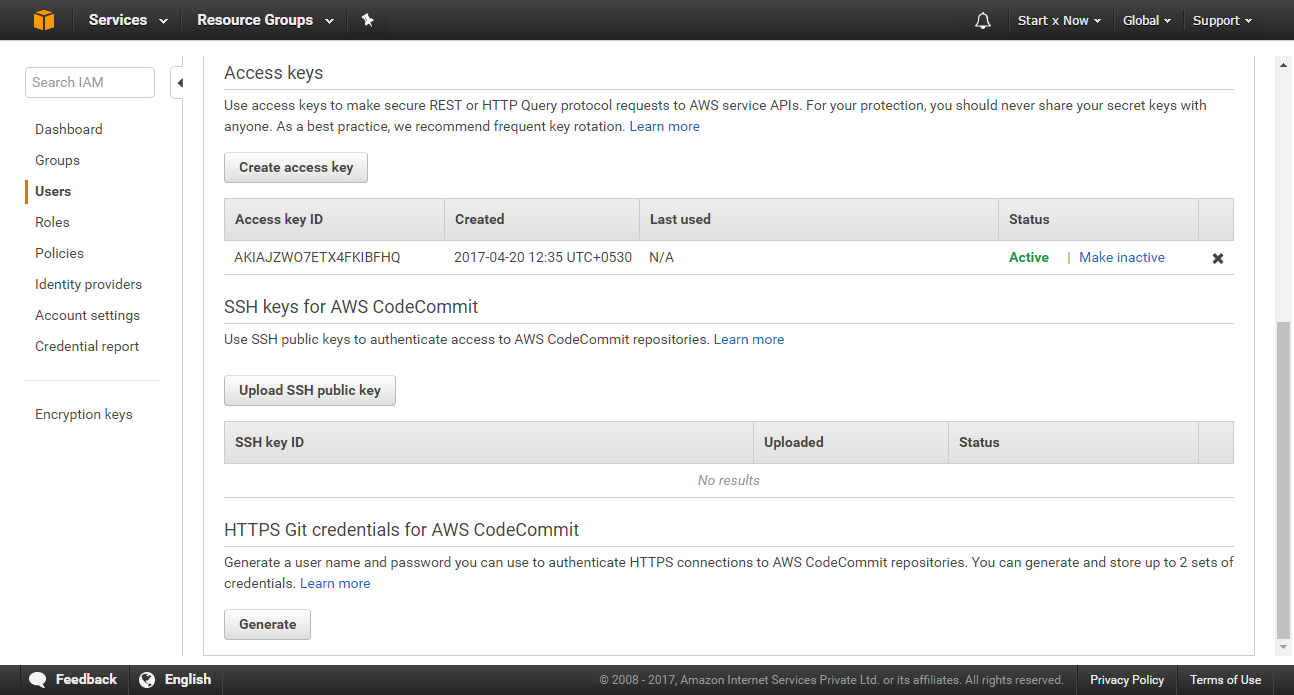
Please save the Username and Password you see, as well as download the file, You cannot get the password again from AWS console.
Now in Access keys panel click on Generate access key. Please note down the Access key ID and Secret access key. This will be used with the aws-sdk package.
If you have trouble creating new users, Just let me know and i will guide you and/or update the tutorial.
Step#2: Create New CodeStar Project
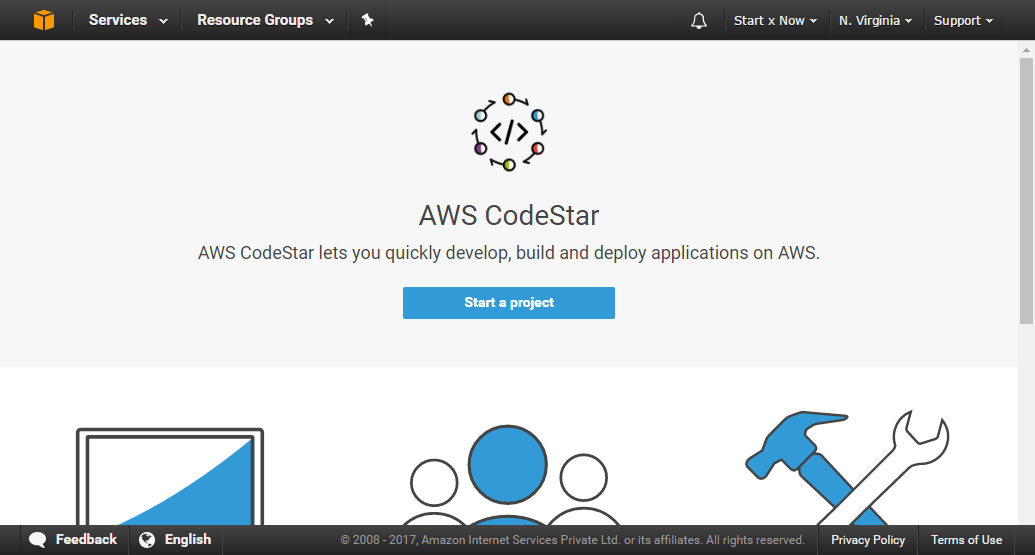
Open https://console.aws.amazon.com/codestar and click on Create a new project or Start a Project
If you see Region Unsupported message, Select a region that's supported. I selected US East (N. Virginia)
If you see Create service role modal pop-up, click on Yes, create role button.
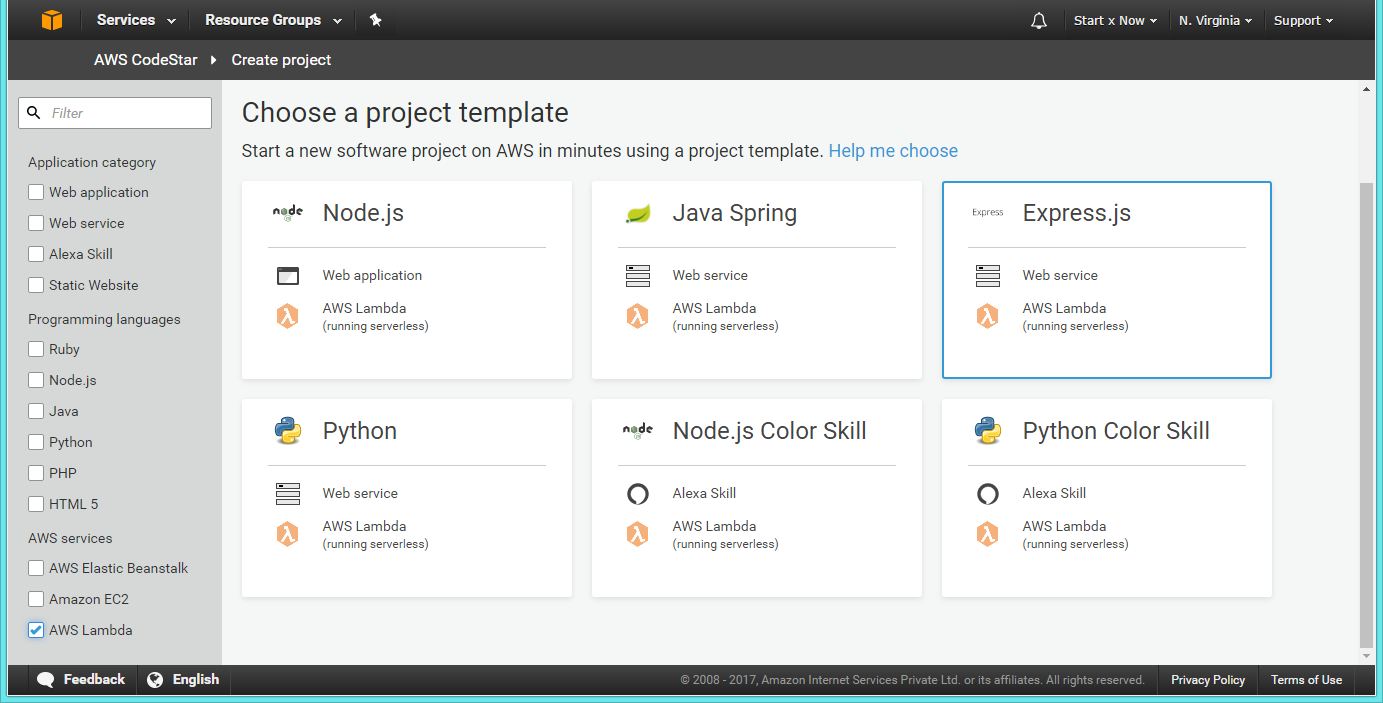
Now you will be asked to choose a Project Template, Click on Express JS - Web Servce, AWS Lambda template.
Now you will be asked to enter Project name and Project ID, After entering these information click on Create Project and wait a little, Our project is being provisioned.
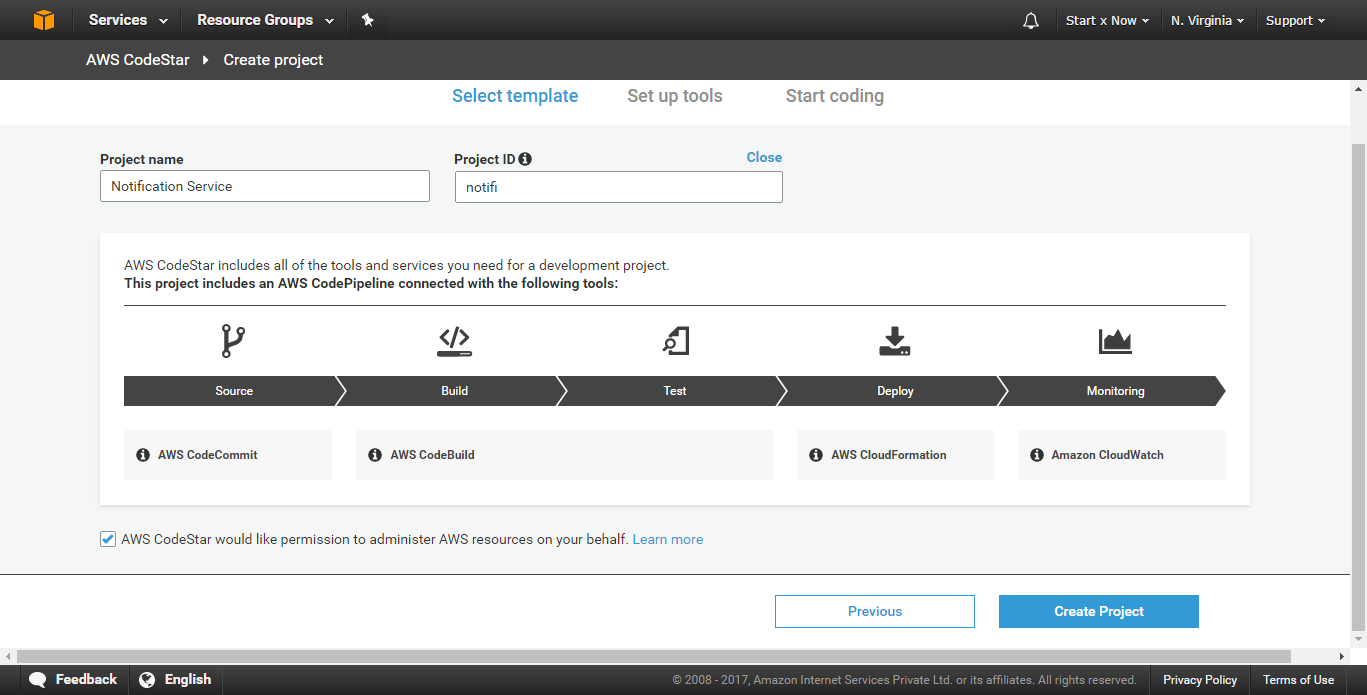
Once the provisioning is completed, You will see a Clone repository URL, copy it and click on Skip button.
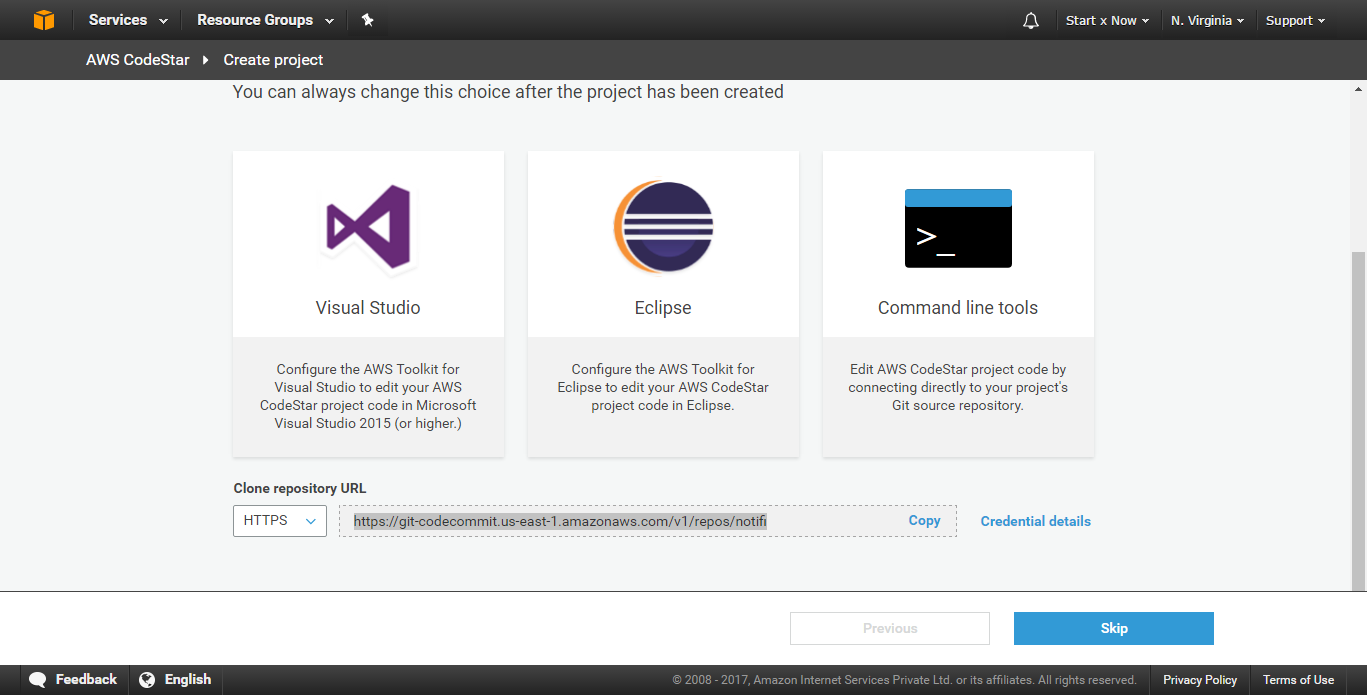
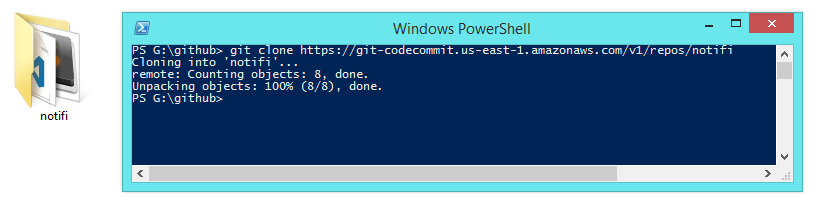
Now open terminal and enter the command git clone REPOSITORY_URL, In this case git clone https://git-codecommit.us-east-1.amazonaws.com/v1/repos/notifi, It will ask you for username and password, But we already have this from Step#1, Enter the username and password that you generated earlier.
This will clone the repo generated by CodeStar and create a new folder locally with its contents.
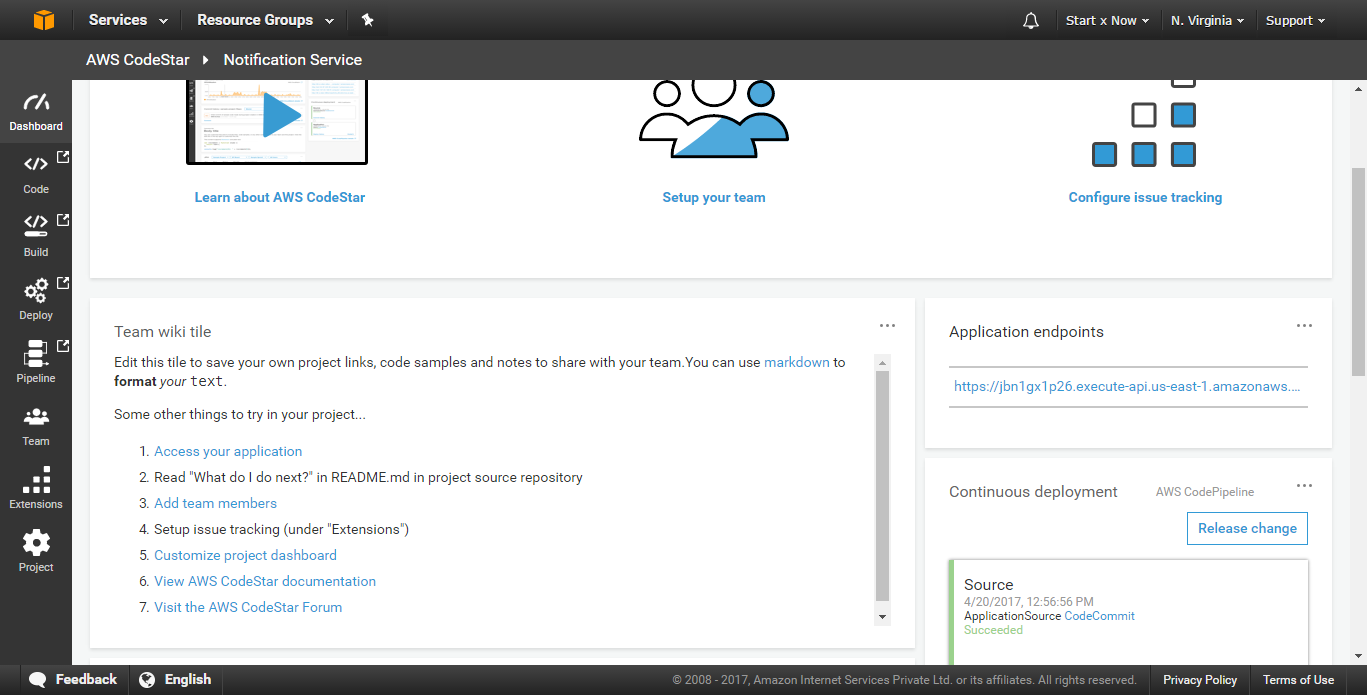
At the same time, In CodeStar projects dashboard, once the Deployment process is completed, you will see your Application Endpoint, That's the endpoint we will be using to communicate with our service.
In my case it's https://jbn1gx1p26.execute-api.us-east-1.amazonaws.com/Prod/
Step#3: Let's Explore the Code and Make Few Changes
Let's Open the directory where we cloned this repository in a code editor. (please use the code editor of your choice)
First, you can see it already has a package.json file with few dependencies listed, This means we can easily use any npm module we want.
Let's edit the package.json file and update the description to Email and SMS Notification Service.
The directory also contains few other files, But we wont get into all these files in this tutorial.
If you open app.js file you can see some code there, If you have used Express earlier then this will easily make sense to you.
There are two methods GET and POST and they respond accordingly when we make API Requests.
For example: When we open our application url https://jbn1gx1p26.execute-api.us-east-1.amazonaws.com/Prod/ we see the message Hello World!
Lets edit the app.js file and let's change our app.get code to
app.get('/', function(req, res) {
  res.json({
  	code: 200,
  	active: true,
  	description: 'Notification Service.'
  });
});
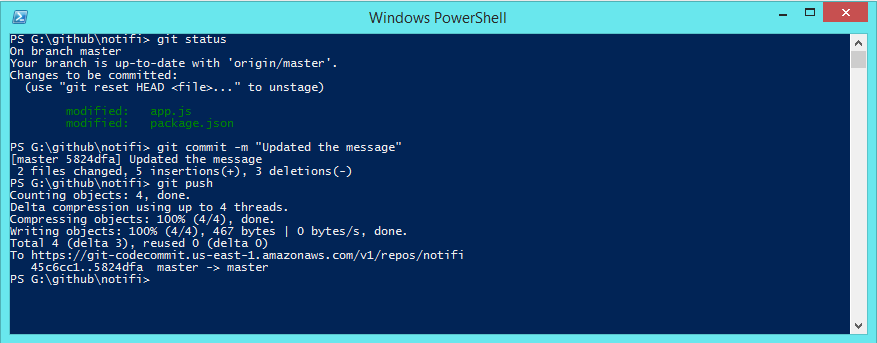
After saving the changes, Let's commit our code., This will trigger our deployment process and once the process is completed, We can open https://jbn1gx1p26.execute-api.us-east-1.amazonaws.com/Prod/ and see the changes reflected there.
The deployment process is slow and takes some time (atleast for me it took some time), So please be patient.
Step#4: Adding Config Files and Testing The Code Locally
While we can easilt write and commit codes, Its just as important to test our code locally first before committing it, Otherwise it will become difficult to find and fix errors.
Luckily this is very easy.
First let's create a directory names config in our Projects ROOT_DIRECTORY
Let's create two files named config/index.js and config/aws.json
In aws.json file add this code, Please reaplce ACCESS_KEY_ID and ACCESS_KEY_SECRET with the values you got it Step#1 and replace REGION with the name of you region, Ex: us-east-1
{
	"accessKeyId": "ACCESS_KEY_ID",
	"secretAccessKey": "ACCESS_KEY_SECRET",
	"region": "REGION"
}
Let's add this code in our config/index.js file
'use strict';

module.exports = {

	PORT: 1001,

	email: {
		from: 'john.doe@gmail.com',
	}

};
Please replace john.doe@gmail.com with an actual email address that you have access to, You will have to verify it later.
The port number specified in this file is the port where we will run this code locally.
Now let's create a new file named server.js in our projects ROOT_DIRECTORY and add this code in it.
'use strict';

const app = require('./app');
const config = require('./config');

app.set('port', config.PORT );

// start the server
app.listen(
	app.get('port'),
	() => {
		const port = app.get('port');
		console.log('AWS CodeStar running at http://127.0.0.1:' + port );
	}
);
This will allow us to run and test our code locally. We can run the command node server.js in terminal and if we open the http://127.0.0.1:1001 we should see the same response we saw at https://jbn1gx1p26.execute-api.us-east-1.amazonaws.com/Prod/
Create a new file named .gitignore and add this code in it, This will make git ignore node_modules directory.
# Logs
logs
*.log
npm-debug.log*

# Dependency directories
node_modules
jspm_packages

# Optional npm cache directory
.npm

# Optional REPL history
.node_repl_history
Let's continue in next section and write our service for sending Emails.
Step#5: Integrate Amazon Simple Email Service and Make our Service send Emails
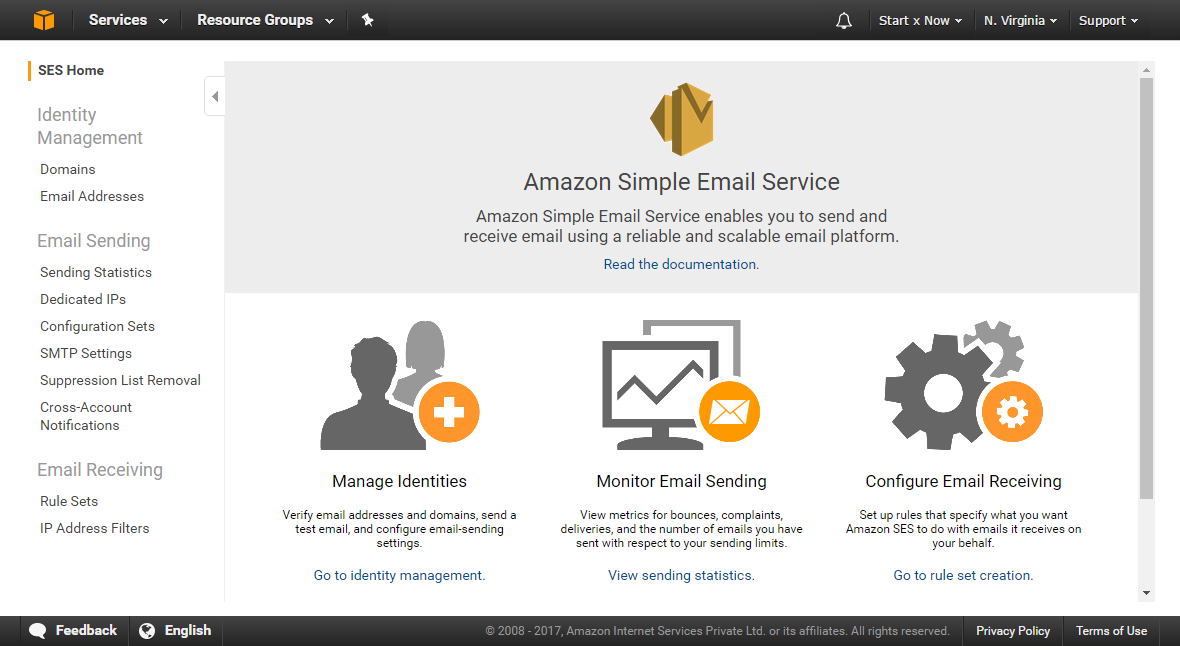
Open https://console.aws.amazon.com/ses, This service will allow us to send emails from our own application/service.
In left sidebar Identity Management click on Email Addresses, Open the page is opened click on button Verify a New Email Address
You will be asked to enter an email address, Please do so and then click on Verify This Email Address
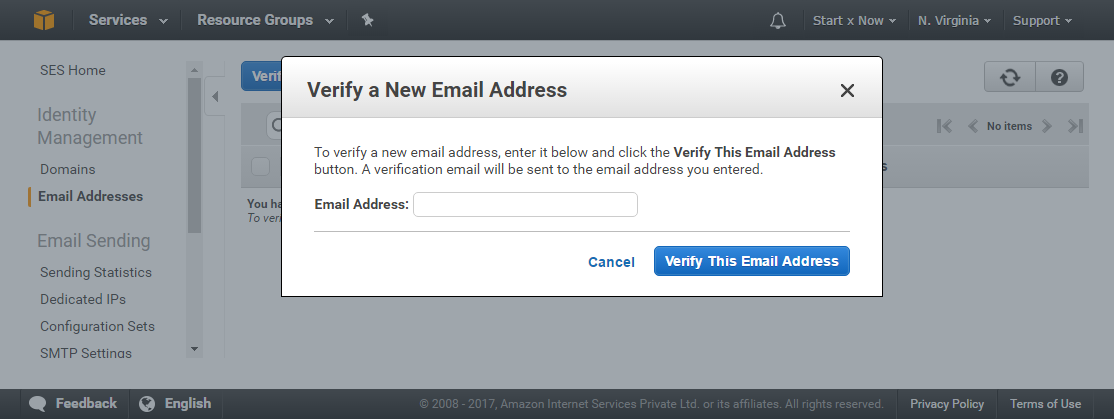
You will receive a verification email at the email address you provided, Click on the verification link and will see a page saying your email has been verified.
Now open https://console.aws.amazon.com/ses and we can see our email has been verified.
As of now we have sandbox access to SES, meaning we can only send a maximum of 200 Emails per hour and maximum of 1 email per second.
You can click on the button Request a Sending Limit Increase to request for limit increase, However this is fine for me so i am not going to do that.
Now let's open terminal in our project/service directory and run the command npm install --save aws-sdk, This will install the aws-sdk package, We will make use of this package for sending email from our service.
While we're at it, Let's also install body-parser package by running the command npm install --save body-parser this will allow us to easily parse the data we send to our service.
Now, The API our service will offer is very simple, We ask for this information and then send the email.
Let's create a new directory named endpoints and create a new file in that directory endpoints/email.js and add this code in that file.
'use strict';

const AWS = require('aws-sdk');
const config = require('../config');
AWS.config.loadFromPath('./config/aws.json');

const SES = new AWS.SES();

module.exports = ( req, res ) => {

	const body = req.body;

	if ( ! body.to || ! body.text || ! body.subject ) {
		return res.json({
			message: 'error',
			description: 'You must specify to, subject and text fields.'
		});
	}


	const email_options = {
		Source: config.email.from, // the email address we verified earlier
		Destination: {
			ToAddresses: Array.isArray(body.to) ? body.to : [ body.to ] // these addresses must be verfied as well otherwise the emails wont be sent.
		},
		Message: {
			Body: {
				Text: {
					Data: body.text
				},
				Html: {
					Data: body.html
				}
			},
			Subject: {
				Data: body.subject
			}
		},
	};


	const email = SES.sendEmail( email_options, (error, data) => {
		if ( error ) {
			return res.json({
				message: 'failed',
				error: error
			});
		}
		return res.json({
			message: 'success',
			description: 'email successfully sent.'
		});
	});


};
Although we can test our service right now, Let's write the SMS Service code as well and then we will test our service.
Step#6: Integrate Amazon Simple Notification Service and Write Code to Send SMS Message
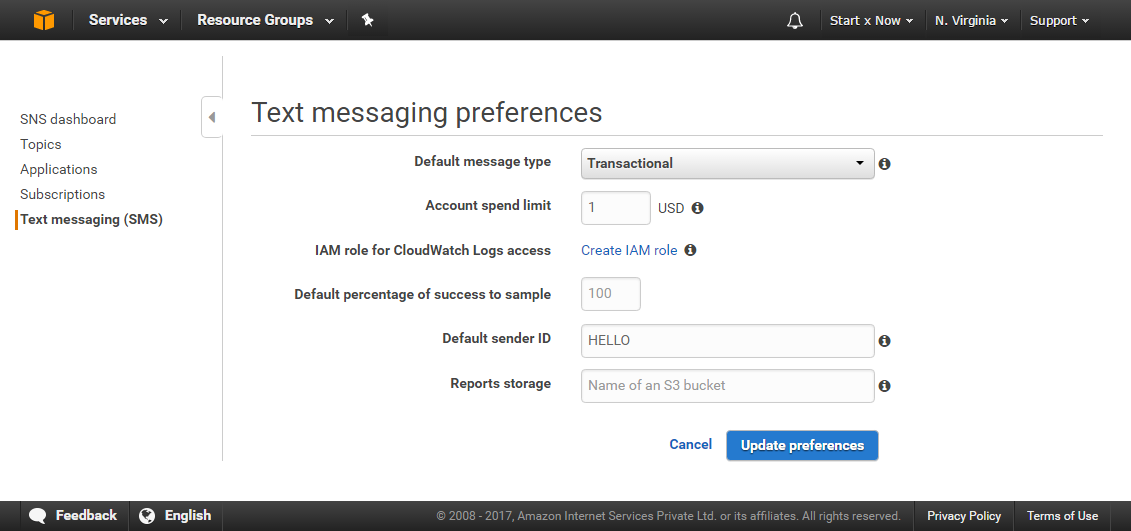
You can set messaging preferences by going to https://console.aws.amazon.com/sns/v2/home, Click on Text messaging (SMS) in left navigation pane and then click on Manage text messaging preferences
Please set your Default sender ID and make all other changes here and click on Update preferences
Now, let's create a file named endpoints/sms.js and add this code in it
'use strict';

const AWS = require('aws-sdk');
const config = require('../config');
AWS.config.loadFromPath('./config/aws.json');

const SNS = new AWS.SNS();


module.exports = ( req, res ) => {

	const body = req.body;

	if ( ! body.to || ! body.message ) {
		return res.json({
			message: 'error',
			description: 'You must specify the to field (phone number) and the message field.'
		});
	}

	const message = {
		Message: body.message,
		MessageStructure: 'string',
		PhoneNumber: body.to
	}

	const sms = SNS.publish( message, (error, data) => {
		if ( error ) {
			return res.json({
				message: 'failed',
				error: error
			});
		}
		return res.json({
			message: 'success',
			description: 'message successfully sent.'
		});
	});


};
This code will send SMS to the number we will specify along with the text.
Step#7: Updating our app.js and template.yml File
app.js and template.yml file, If we don't our service wont work.Open app.js file from project ROOT_DIRECTORY and add this code in it
const express = require('express');
const body_parser = require('body-parser');

const SendEmail = require('./endpoints/email');
const SendSMS = require('./endpoints/sms');

const app = express();

app.use( body_parser.json({ limit: '50mb' }) );
app.use( body_parser.urlencoded({ limit: '50mb', extended: true }) );


app.get('/', function(req, res) {
	res.json({
		code: 200,
		active: true,
		description: 'Notification Service.'
	});
});

app.post('/email', SendEmail );
app.post('/sms', SendSMS );


// Export your Express configuration so that it can be consumed by the Lambda handler
module.exports = app
You might think this will work, Because if you test this locally it will work, Hoever it won't work when we push our code because AWS CodeStar relies on template.yml file route configurations.
So lets edit template.yml file from project ROOT_DIRECTORY and add this code in it
AWSTemplateFormatVersion: 2010-09-09
Transform:
- AWS::Serverless-2016-10-31
- AWS::CodeStar

Parameters:
  ProjectId:
    Type: String
    Description: AWS CodeStar projectID used to associate new resources to team members

Resources:
  HelloWorld:
    Type: AWS::Serverless::Function
    Properties:
      Handler: index.handler
      Runtime: nodejs4.3
      Role:
        Fn::ImportValue:
          !Join ['-', [!Ref 'ProjectId', !Ref 'AWS::Region', 'LambdaTrustRole']]
      Events:
        GetEvent:
          Type: Api
          Properties:
            Path: /
            Method: get
        PostEvent:
          Type: Api
          Properties:
            Path: /
            Method: post
  HelloWorld2:
    Type: AWS::Serverless::Function
    Properties:
      Handler: index.handler
      Runtime: nodejs4.3
      Role:
        Fn::ImportValue:
          !Join ['-', [!Ref 'ProjectId', !Ref 'AWS::Region', 'LambdaTrustRole']]
      Events:
        PostEvent:
          Type: Api
          Properties:
            Path: /email
            Method: post

  HelloWorld3:
    Type: AWS::Serverless::Function
    Properties:
      Handler: index.handler
      Runtime: nodejs4.3
      Role:
        Fn::ImportValue:
          !Join ['-', [!Ref 'ProjectId', !Ref 'AWS::Region', 'LambdaTrustRole']]
      Events:
        PostEvent:
          Type: Api
          Properties:
            Path: /sms
            Method: post
Now let's commit our changes and push our code to AWS CodeStar.
Step#8: Testing Our Service
Let the deployment process complete first, After that open the Application URL https://jbn1gx1p26.execute-api.us-east-1.amazonaws.com/Prod/ in Postman
If you don't know what Postman is, Its a chrome extension that allows us to test API endpoints very easily., URL: https://www.getpostman.com/
To send an email, Make a POST request, With the below body/data to our /email endpoint.
URL: https://jbn1gx1p26.execute-api.us-east-1.amazonaws.com/Prod/email
Method: POST
Headers: Content-Type: application/json
{
	"to": "john.doe@gmail.com",
	"subject": "Hello World",
	"text": "This is a Text email.",
	"html": "<h1>HTML Email</h1><p>Hello World.</p>"
}

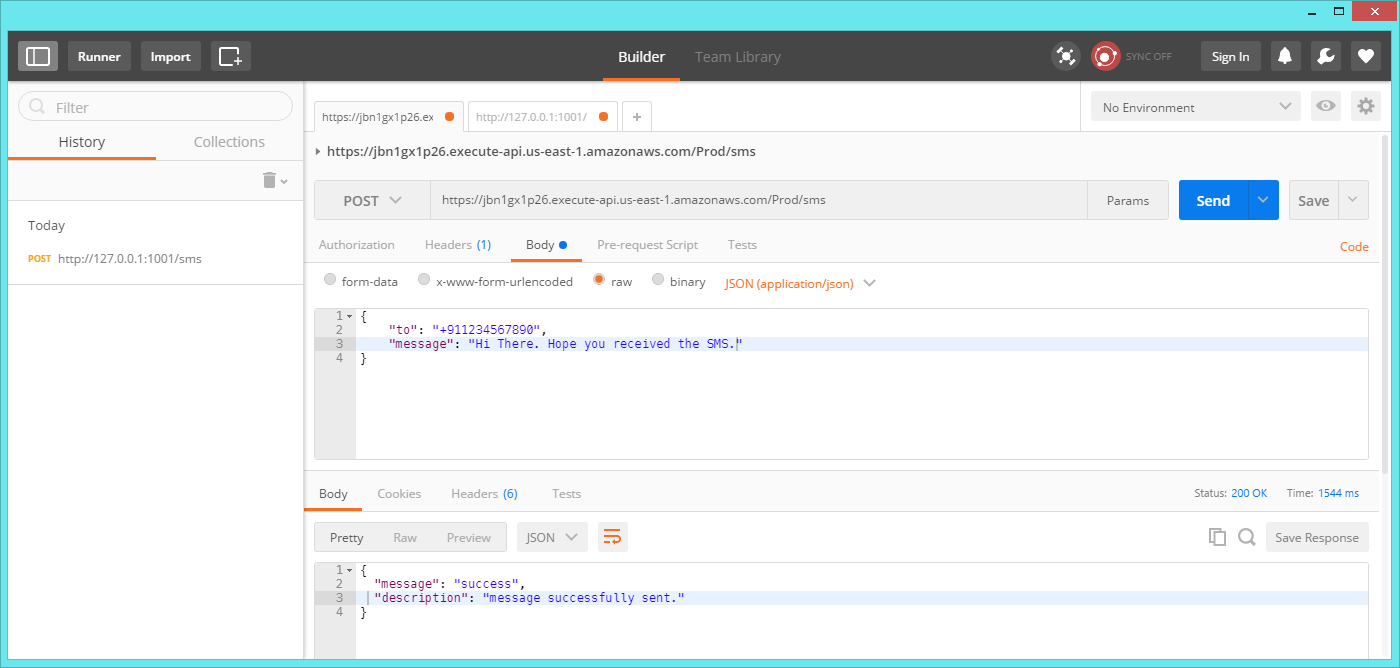
To send a SMS, We follow the same process.
Make a POST request, With the below body/data to our /sms endpoint.
URL: https://jbn1gx1p26.execute-api.us-east-1.amazonaws.com/Prod/sms
Method: POST
Headers: Content-Type: application/json
{
	"to": "+911234567890",
	"message": "Hi there, Hope you're doing alright."
}
Step#9: Security
What you can do is create a middleware, Which will be run on every POST API request, It will check if a parameter code exists on body, If it does it will validate it and if its correct the Application will function as expected otherwise Invalid Code error will be thrown.
To implement this, All we have to do is, Open app.js file and add our middleware code
const express = require('express');
const body_parser = require('body-parser');

const SendEmail = require('./endpoints/email');
const SendSMS = require('./endpoints/sms');

const app = express();

app.use( body_parser.json({ limit: '50mb' }) );
app.use( body_parser.urlencoded({ limit: '50mb', extended: true }) );


// Our middleware, This will check if code is provided or not, And if its correct.
app.use( ( req, res, next ) => {

	if ( req.method === 'POST' ) {
		if ( req.body.code && req.body.code == 'SUPERSECRETCODE' ) {
			return next();
		} else {
			res.json({
				message: 'Invalid Code',
				description: 'Please enter a valid code.'
			});
		}
	}
	next();

});


app.get('/', function(req, res) {
	res.json({
		code: 200,
		active: true,
		description: 'Notification Service.'
	});
});

app.post('/email', SendEmail );
app.post('/sms', SendSMS );


// Export your Express configuration so that it can be consumed by the Lambda handler
module.exports = app
Now unless you specify "code": "SUPERSECRETCODE" in body while making POST requests, Our services wont be called.
You can checkout the repository for this tutorial here https://github.com/dhruv-kumar-jha/aws-codestar-tutorial